
No need to go through complex editing software to extract sequences from a video! The tools built into Windows and macOS and free software are enough to keep only the passages that interest you.
Want to cut out a video that you downloaded from the internet, picked up on a phone, or was sent to you to keep only a portion of it? It is sometimes practical, even essential, to share only an interesting section on a social network, for example. No need to use specialized and complicated editing software for such a simple operation: whether you use a PC or a Mac, you can easily and quickly extract one or more sequences with the tools built-in standard to Windows 10 and macOS. And if you want to go a little further, still without a purse untied, you can also prune a video by removing unnecessary passages to keep only those that interest you with free software. There are many, such as Avidemux, VidCutter, Free Video Cutter, Media Cope, Video Edit Master or Moo0 Video Cutter, to name a few.
Whatever solution you choose, you will not lose quality since the operation takes place without re-encoding. As a result, the blow is immediate, even on a heavy file. On the other hand, pay attention to the video format: the software that we present in this practical sheet manages the most common codecs and containers (MP4, MOV, AVI, MKV, etc.). But other more exotic formats may require conversion first.
Either way, you recover one or more files in the same format as the original. You are then free, according to your needs, to delete the original file to make some space on your computer!
If you just want to extract specific portion from video with Windows 10 PC, you don’t have to install any additional software. The Microsoft operating system indeed embeds the Photos application which, despite its reductive name, has several functions to perform basic manipulations on videos.
- Using Windows Explorer, browse the tree structure of your PC and find the video you want to cut.
- Right-click on the video file, and then from the pop-up menu that appears, select Open with and click on the application Pictures in the cascading submenu.
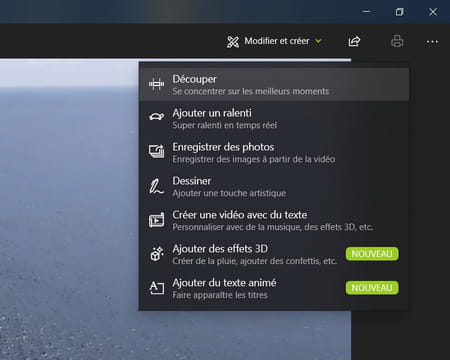
- The video will immediately open in playback mode in the Photos window. Click on To modify and create at the top right, then on Cut.
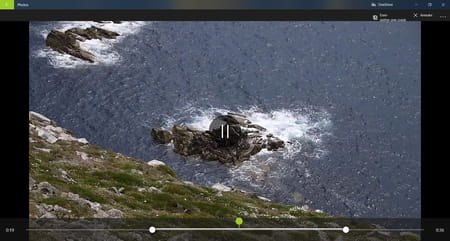
- The video is then displayed in an editing window. Using your mouse or trackpad, move the white dots displayed at the start and end of the playbar to mark the start and end of the part of the video you want to keep. Press on play button or use the space bar on your keyboard to view the selected video passage. Adjust the white points if necessary to refine the start and end of the sequence. When you are satisfied with the selection, click on the button Save a copy, at the top right of the window.
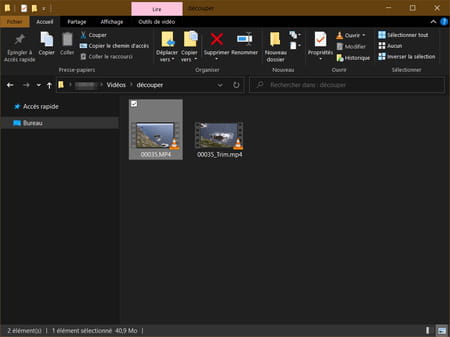
- The video passage you have just cut opens in a new playback window. The new video file was automatically saved in the same directory as the original video, with the same name with the suffix _trim has been added. You can of course rename it.
- Repeat the operation as many times as necessary if you are interested in other parts of the original video. Each extract will be saved in a specific file.
Extracting a specific passage from a video on macOS can be done very easily without installing any third-party software. The QuickTime Player media player, installed by default on Macs, includes a basic editing tool that is very easy to learn to trim a video and keep only a specific passage.
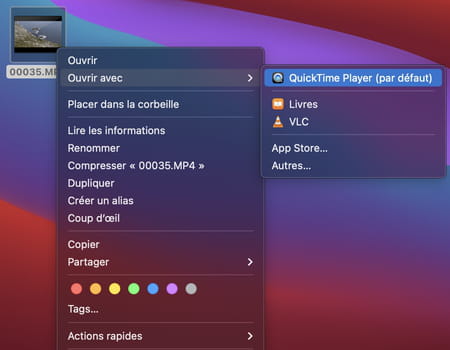
- Double click on your video file to open it in QuickTime. If the video does not open by default in Apple’s media player, right-click on the file, go to the menu Open with and choose QuickTime.
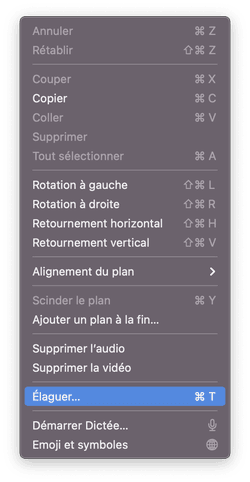
- Once the video is open in QuickTime Player, click on the menu Editing then on Prune, or directly use the keyboard shortcut Command + T.
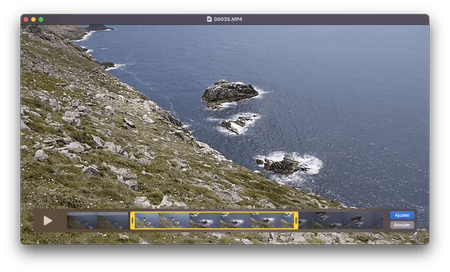
- The video editing tool opens directly within the QuickTime Player playback window. Using the mouse, move the right and left handles of the yellow box to define the start and end of the passage to keep in the video. Once the selection is perfectly defined, click on the button Adjust displayed at the bottom right of the window.
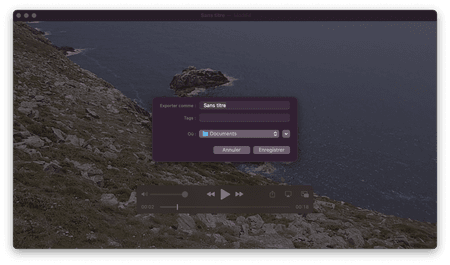
- The trimmed video is now open in QuickTime Player. At this point, the file is not yet saved to your Mac’s disk. To save it, click on the menu File, then on Save, or use the keyboard shortcut Command + S. Select a location, enter the name of your file and click Save.
- Repeat the operation as many times as necessary if you wish to extract other passages from the original video. Each sequence will be saved in a specific file.
To go a little further in extracting sequences, it is preferable to use specialized software such as Avidemux. Admittedly, this rather old tool sports an old-fashioned and austere interface, uninviting at first glance. But this open source utility is free, lightweight, in French, and compatible with Windows, macOS and Linux. Above all, it is both efficient, precise and very easy to use. Better still, if it obviously knows how to extract one or more sequences from a video to make independent files, it also makes it possible to prune a file, by removing unnecessary passages. You can erase all the portions that do not interest you (credits, commercials, failed takes, etc.) in a few seconds and keep only the best moments in a single file, without having to paste. Practice ! The screenshots below were taken on Mac, but the interface and operations are strictly identical on PC.
- With your web browser, download the version of Avidemux suitable for your operating system and install it: the operation is simple and classic, without any trap, just follow the steps as indicated on the screen.
Download Avidemux for Windows
Download Avidemux for macOS
- After installation, launch Avidemux and import your video file by clicking on the menu File then on To open to select the video stored on your machine. You can also directly drag the video file from Windows Explorer or macOS Finder into the application and drop it onto the Avidemux window.
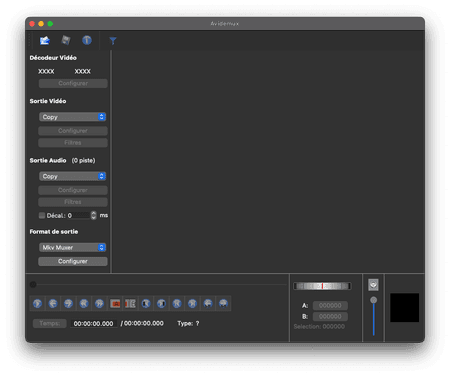
- The window automatically expands to display the video. Do not touch any of the settings on the left side of the window, which are automatically set to Copy. They indicate that the video will not be recoded. If you modify them, for example to choose another recording format, the operations will take much longer …
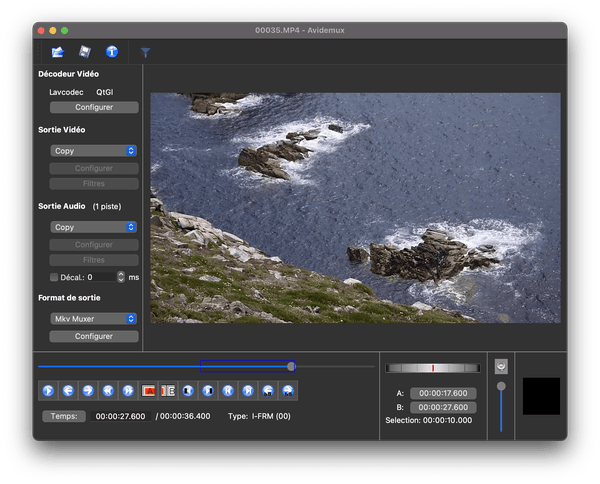
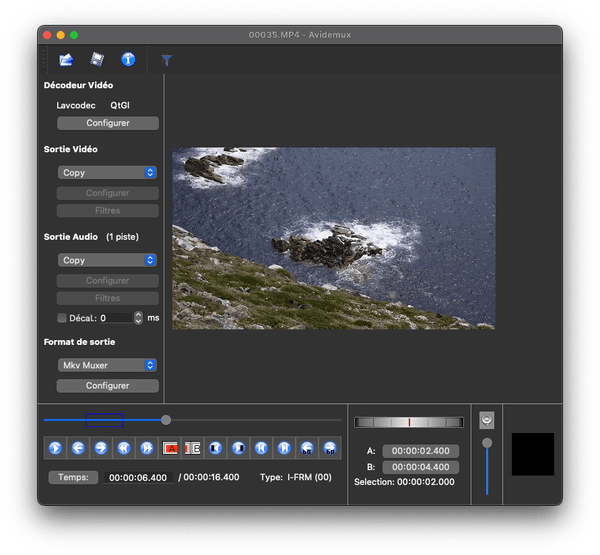
- If you just want to extract a clip from your video, move the cursor in the play bar at the bottom of the window to place it at the start of the passage you want to keep. You can also use the arrows on the keyboard for more precise positioning. But, in this case only, check in the line at the bottom of the window that you are correctly set on an I-FRM type image (reference image, that is to say integral): if you are on an image type P-FRM (predictive image) or B-FRM (bidirectional image), you may have problems with synchronization between sound and image in your final file.
- Then click on the red button Put marker A in the toolbar below. A blue box delimiting the passage to be kept is displayed. By default, it stretches to the end of the video.
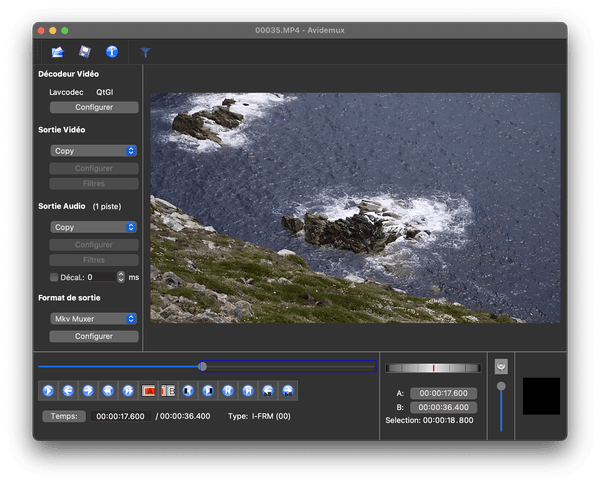
- Then move the play cursor to where you want your selection to end and click Put the marker B in the toolbar. The blue box then adapts to exactly match the part of the video you want to keep.
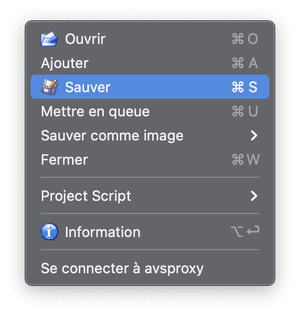
- You still have to save your extract. Click on the menu File, then on To save. Select a location on your computer and give your file a name. Then validate by clicking on the button Save.
- Of course, you can repeat the same manipulation if you have other sequences to extract to have individual files.
- But if you want, you can also trim your video by removing the parts you don’t want to keep. To do this, select a section that you want to delete by moving the cursor and using the markers as explained above. When your selection is made, press the key. Delete on your keyboard. The corresponding section is immediately deleted. Repeat with all the passages you want to remove to keep only the sequences that interest you.
- When your pruning is finished, click on the menu File, then on To save to save your file under a meaningful name in the location of your choice. Rest assured, the original video is intact. If you no longer need it, delete it from your computer.