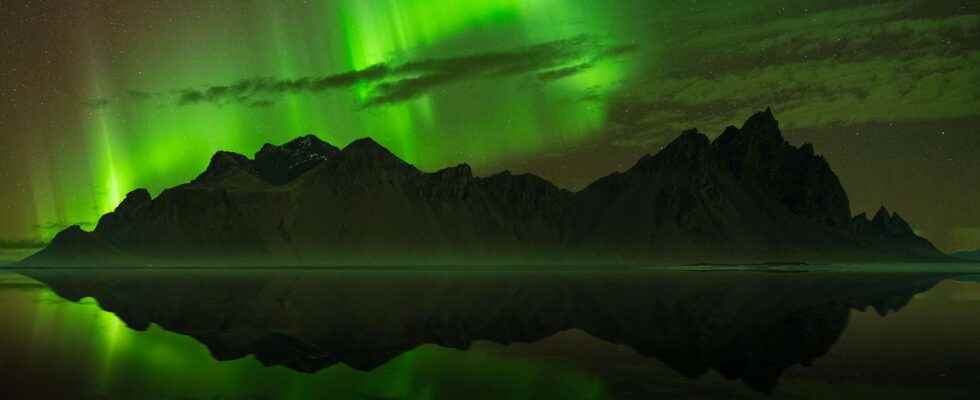
Known as the ‘Aurora Borealis’, the Auroras, these bright, colorful bands of light that move and ripple, are a majestic sight in the night sky of the Northern Hemisphere. But what is the cause of this natural spectacle? Delil Geyik, specialist in astrophotography, explains the phenomenon to us and gives us valuable advice on how to successfully capture the aurora borealis.
You will also be interested
[EN VIDÉO] Kézako: how do the auroras form? The auroras result from the interaction between particles ejected by the Sun and the Earth’s magnetosphere. They appear in the sky in the form of lights ranging from green to red. This episode of Kézako, Unisciel and the University of Lille 1 explains this superb phenomenon.
Understanding the aurora is the basis for successful photography. Ultimately, solar activity is also the cause of auroras, which we know as thenorthern Lights. It is an electrometeor caused by the impact of charged particles from the solar wind on theatmosphere earth, especially at the Earth’s poles. If this current collides with the earth’s magnetic field, resulting in a reaction at high energy, which emits light in different colors visible. We perceive them as the aurora borealis. The higher the speed of the solar wind, the greater the probability of observing auroras in the sky.
About solar flares and coronal holes
Depending on its speed, the solar wind takes two to four days to reach the Earth. The most energetic auroras are usually the result of a hole in the solar corona, directed towards the Earth. During such events, the solar wind reaches higher speeds, up to 800 kilometers per second. Insiders call a hole in the solar corona, a coronal hole. The ejections of mass Coronal, or CME for short, are ultimately responsible for a particularly strong aurora intensity. A CME occurs when a buildup of magnetic energy focused on the sun bursts into a Solar eruption and can no longer be contained by the sun’s gravity. In this process, a huge cluster of charged particles is hurled into space with unimaginable energy. The arrival of a CME on Earth is heralded by strong northern Lights, which in extremely rare cases can be observed as far away as Germany.
Why aren’t the Northern Lights always green?
Many people think that the Northern Lights are exclusively green. But in fact, magenta, blue, and even deep red can be seen and photographed on nights when the auroras are particularly active. Each gas (oxygen and nitrogen in the form of molecules and D’atoms) emits a particular color, depending on the energy of the particles. Since the composition of the atmosphere varies with altitude, auroras at altitudes of 100 to 240 kilometers are generally green, as charged particles interact in some way with oxygen.
Red is not common. When auroras are very active, they develop above 240 kilometers altitude due to a different interaction with oxygen. A pink or magenta aurora is a mixture of green and red. Blue and purple are caused by charged solar particles interacting with the nitrogen in our atmosphere. Interestingly, auroras are more colorful in more temperate regions. This is because more energy is needed for the Northern Lights to be visible further south. And more energy means more colors.
When can we expect to see an aurora?
In space, between the sun and our planet, there are satellites that measure the solar wind. It takes about an hour for the solar wind to reach our planet. I use the data from these satellites to find out if it’s worth going out to photograph. I use spaceweatherlive.com mainly to predict the Northern Lights. To make your own aurora forecast for your destination, the following factors are helpful:
- your location: near the polar Circle arctic, you’ll probably be able to catch the aurora under pristine skies. There is almost always some green in the sky, provided it is clear and dark enough, as it is from September to March.
- Kp Index: If there’s one thing you need to learn to predict auroras, it’s how to use the Planetary K Index (Kp Index). It is applied to characterize the strength of storms geomagnetic. The Kp index is an excellent indicator of disturbances in the earth’s magnetic field and therefore the possible appearance of auroras. The scale goes from 0 to 9, where 5 or more indicates a thunderstorm geomagnetic. The higher the scale, the further south the auroras are visible.
- the Bz value: it is a parameter for the intensity of the magnetic field interplanetary in the direction of the Z axis and is given in nanotesla (nT). The lower the value (negative), the more likely the occurrence of auroras in Germany. A Bz value below -10nT is a good sign that a geomagnetic storm is about to occur.
- solar wind velocity: the faster the solar winds hit the Earth’s atmosphere, the stronger the interaction with the magnetic field, the stronger the auroras. The normal speed of the solar winds is about 375 km/s. If the speed is expected to double, the specialists are preparing for particularly attractive motives. When such forecasts are made, it is advisable to pack warm clothes and equipment and go outside. Aurora are usually particularly impressive in the northern United States, southern Australia, Scotland, or near the Arctic Circle.
Which camera and lenses to use?
To be able to capture an auroral image on the chip, no expensive equipment is required. It is only important that the camera has a manual mode to be able to adjust the settings individually. I use the Sony A7 III as a camera, which is very suitable for photography at night due to its ideal noise ratio. I use the Zeiss Batis 2.8/18mm for this, which is sharp all the way to the edge, even wide open. A tripod is essential, its design and its construction must guarantee absolute stability, even in windy conditions, during exposure times of 7 to 25 seconds. Also, you can use a remote shutter so you don’t have to touch your camera to trigger theshutter. This is not absolutely necessary, as almost all cameras have a built-in self-timer function. So, after pressing the shutter button, a short amount of time elapses before the camera is triggered.
What are useful camera presets?
- Locking the mirror : to avoid the slightest blur, activate the mirror lockup function on a DSLR digital.
- Image stabilizer: If you work with a tripod, the image stabilizer of the camera and that of the lens are superfluous. Disable them both.
- Noise reduction: To avoid long delays between shots, always turn off in-camera noise reduction at night.
- Autofocus: To have full control over image sharpness despite difficult lighting conditions at night, turn off autofocus and focus manually.
- Format RAW : To get the best possible post-processing, shoot your photos in RAW format if possible. Only RAW mode allows you to be sure that no image information is lost.
- Manual mode: In astrophotography, always make all settings manually. It is best to use “M” mode.
- Exposure time: Auroras move like water in a river – sometimes faster, then slower. If water, which moves quickly, is exposed for more than 15 seconds, it forms a milky surface. It’s a magnificent sight for landscape photography, but rather inappropriate for the aurora. Indeed, we want to preserve the aurora structures and photograph them as we can see them in reality from our own eyes. So my recommendation is as follows: expose between 5 and 25 seconds.
- Exception: If the aurora is moving quickly across the sky, you should choose an exposure time of 5-7 seconds. If it moves slower, try an exposure time of 10-25 seconds.
- Sensitivity adjustment: there is no sensitivity ISO ideal for photographing the Northern Lights – it depends on how much extra light you need and how ISO sensitivity affects other settings, such as shutter speed and aperture. The higher the ISO, the more light you will capture, but keep in mind that photos will also look grainier at high ISO.
- Aperture: Consider a fast wide-angle lens your best friend. When it comes to photographing the sky nocturnal, we cannot give up the light. A wide-angle lens also allows relatively long exposure, as well as a larger section of the Milky Way. Therefore, the more focal distance is shorter, the longer you can expose. The same principle applies to the aperture: the smaller the f-number or the larger the aperture, the more light can fall on the sensor and therefore the shorter the exposure time.
I wish you to see and photograph fabulous Northern Lights.
Interested in what you just read?