
Do you want to use two different systems – or more – on your PC, but without going through a virtual machine? The dual boot represents an easy to set up and comfortable solution to use the OS of your choice.
A PC is not confined to a single operating system. It can accommodate and use several. Here Windows 11, there Windows 10, there again a light version of Windows like AtlasOS (read our practical sheet), Ubuntu or another Linux distribution, etc. To be able to operate these different OS (Operating System, or operating system in French), we generally rely on virtual machines. Thanks to tools such as VirtualBox or VMWare Workstation, for example, it is possible to run an entire system, whatever it is, within another system, in this case, the one that drives your computer (read our Factsheet). The two systems thus operate in parallel; simultaneously – with a “host” welcoming a “guest” –, and it is possible to switch from one to the other at any time, in one click, and even to exchange data between them.
However, if this virtualization system proves to be simple to set up and practical to use, it has a drawback. It requires a relatively powerful PC to properly operate the virtual machine and its host at the same time. Indeed, two systems run in parallel (the one that drives the PC and the one that runs in the virtual machine). So that the virtual system never really takes advantage of all the power of the PC, causing here and there some slowdowns.
To avoid this phenomenon and fully exploit all the resources of the PC, it is better to opt for dual boot (double boot in French). This time, the idea is to install two systems – or more – on the computer and to choose at startup which one to launch. This time, no more simultaneous use or virtual machine, but alternation with a single system running on the computer.
Mac users who want to use Windows on their machine are familiar with this process which, thanks to Apple’s Boot Camp tool, allows you to start on macOS sometimes on Windows. This concept also applies on PC. It allows you to reserve a partition of storage space for another system than the one installed on the computer. Once the new OS is in place, when starting the PC, the user only has to choose which system he wishes to start on. Convenient. Especially since there is not strictly speaking a limit as to the number of OSes that can be installed. It mostly depends on the available space in the hard drive or SSD of the PC. Here’s how to set up dual boot.
To install a second OS on a PC without using a virtual machine, no tool is required. Windows knows how to handle the maneuver. You just need to bring the system you want to install and show a little patience. Before you start, also check the available space in your storage space. Because an operating system takes up space (between 30 and 100 GB depending on the OS). For our example, we will install AtlasOS (a lightweight Windows 10) alongside Windows 10 Pro.
► Do you have enough free space in the storage space? So the first step is to create a new partition on your disk. It is she who will host the new system you want to use on your PC. To do this, open the Windows Disk Management tool and create the new partition as we describe in our practical sheet. Leave the partition as is Unallocated. Do not format it.
► Now take the USB key containing the system you want to install next to the main system. You can create this installation key with Microsoft’s Media Creation Tool if it is a Windows version (read our practical sheet) or the free utility Rufus for example (read our practical sheet ). Boot your PC from the USB drive.

► The computer boots to the system installer (Windows 10 in our case). Follow the installation steps as usual indicating the version of Windows to install, optionally entering the license key, etc. up to the window What type of installation do you want to perform. Here, click on the option Custom: install Windows only (advanced).

► The new window that is displayed shows all the partitions saved on the storage space. Then choose the reader flanked by the mention Unallocated that you created earlier. The Windows installation then starts on the partition.

► Once the installation is complete, the PC restarts and presents a new window: the Boot Manager (or boot manager in French). It displays the two systems present on your PC. Choose the one you want to start on.

► The Boot Manager only gives you a few seconds to make your choice. After this time, the system designated by default is launched. However, the Boot Manager offers options to manage its operation. When displayed on the screen, click Change defaults or choose other options.
► You can then set the timer (between 5 seconds and 5 minutes) to give you time to choose but also designate a default system if you ever delay making your choice.

As you have noticed, when starting the PC, the Boot Manager displays the systems present with simple names. In our example, Windows 10 and… Windows 10. Only the volumes on which both are installed allow the two versions to be distinguished. Not easy. To see more clearly, you can modify these names using a few command lines.
► Open the Windows Command Prompt as administrator. To do this, right-click on the Start menu and choose Windows PowerShell (admin) from the menu that appears. In the window that is then displayed, type the following command and validate with the key Entrance of your keyboard.
Bcdedit
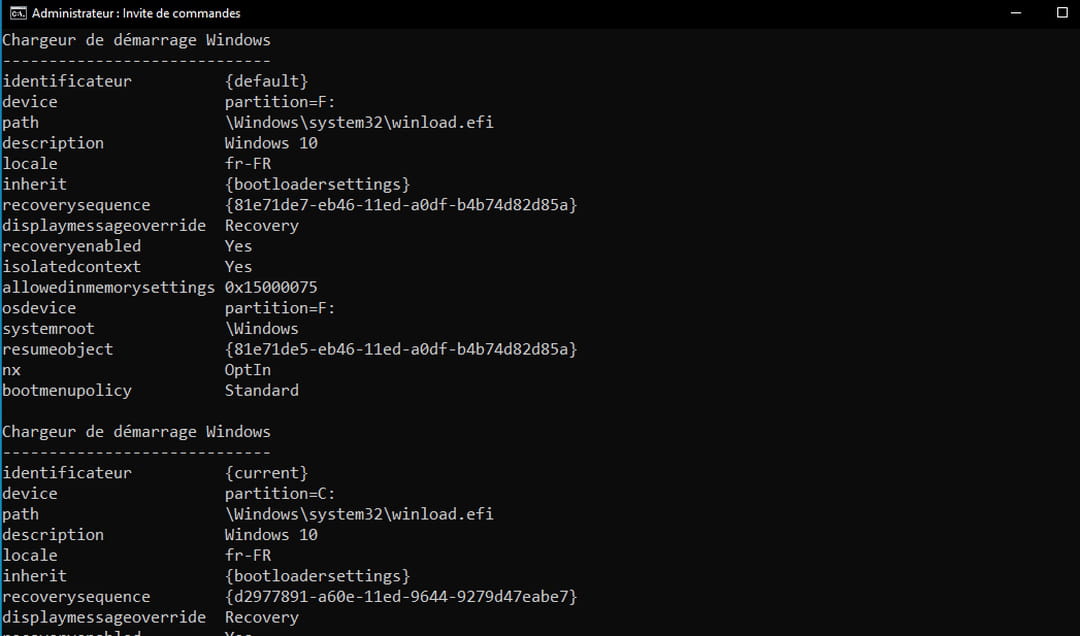
► The Windows boot loaders are displayed in the window. On the front line Identifier face default then, on the line Descriptionbelow, the name of the system, Windows 10. Same as the second section Windows Boot Loader which corresponds to the second system present managed by the Boot Manager. Here the identifier is current and indicates that it is the version of Windows currently used baptized on the line Descriptionher too Windows 10.
► To modify the name of the system currently used, type the following command and validate.
bcdedit /set current description "Windows 10 Home"
► To modify the name of the system you have just installed (Windows by default in our example), type the following command and validate.
bcdedit /set default description "AtlasOS"

►You can now restart and see that the names have been changed.
