
Do you have multiple PCs or Macs and want everyone to be able to access each other’s content quickly and easily? A few settings in Windows and macOS are enough to connect all your networked computers.
Having two or more computers at home is becoming more and more common. PC and Mac connect to the Internet through the box which has a router on board and takes care of traffic management. It would be a shame not to take advantage of the strengths of this router to make all the computers in the house communicate with each other. It thus becomes possible to share files without using a USB key, without going through an online storage service (cloud) or even, without going through the hard drive of the Internet box if it has one. Everything takes place within the local network, whether the machines are connected to the box by Ethernet (with cables) or by Wi-Fi (wireless). A real time saver when it comes to recovering a very large file (like a movie) on a computer to copy it to another or to provide a member of the household with a complete album of photos, for example .
However, for those who have never looked into the network settings of both Windows and macOS, the task can seem complex and many misunderstandings. The so-called shared folders do not appear on one machine but are displayed on another, authorizations are sometimes requested, sometimes ignored… enough to tear our hair out! Rest assured, if Microsoft has removed the HomeGroup feature so dear to Windows 7 and yet very practical, Windows 10 continues to embed all the pieces of the puzzle necessary for the creation of an efficient network. As for macOS, although very finicky about the authorizations granted, it also allows to establish a solid and transparent communication with the PCs without requiring special knowledge.
Microsoft has greatly simplified the operations required to connect several PCs to a local network. Everyone will be able to access a folder made available by a user on their own computer. Obviously for everything to work perfectly, each machine must be connected to the Internet box via Ethernet or Wi-Fi.
- To begin with, it is necessary to verify that each PC which must join the network is indeed using the same configuration vis-à-vis the Internet box. Indeed, by default, Windows 10 considers the network of your box as a public network and applies certain restrictions. Access to Settings Windows by pressing the keys Win + I on the keyboard, then click Network and Internet.
- The window State that appears shows how your computer is connected to the Internet (here, through the Wi-Fi network established by the box). Click on the button Properties placed on the type of connection used.
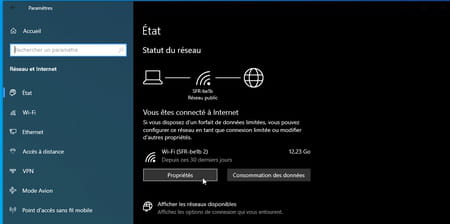
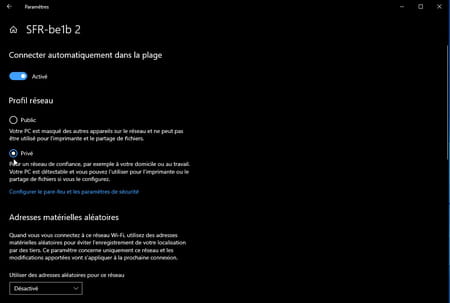
- In the section Network Profile, activate, if it has not already been done, the Private. This will allow you to access file and printer sharing. Repeat these operations on each PC.
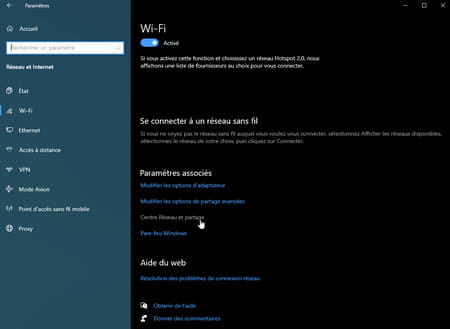
- Now return to the previous window by clicking on the top left arrow interface, next to Settings. Scroll down the contents of the window and click on the link Network and Sharing Center.
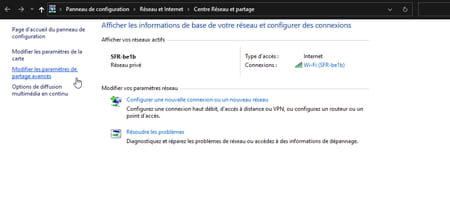
- The Windows Control Panel appears with the settings options. Click in the left pane on the link Change advanced sharing settings.
- To section Private (current), check that the box Enable network discovery is checked just like the box Enable automatic configuration of devices connected to the network.
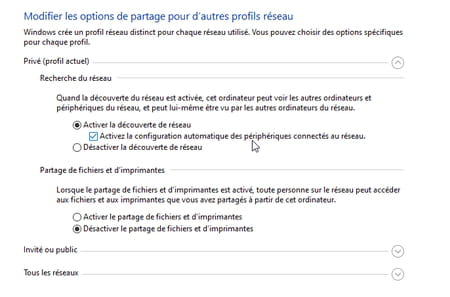
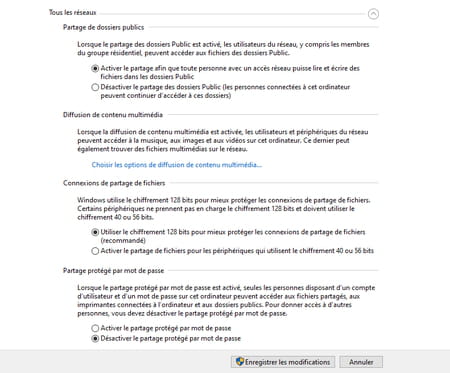
- Now scroll down to the section All networks. In the section Sharing public folders, Check the box Activate sharing (…) to open access to the file Public of the user. To section Password protected sharing, Check the box Turn off password protected sharing. Without this precaution, each member of the household would have to have a user account on this PC to share files. Click on the button Save Changes at the bottom of the window. Repeat these operations on all the PCs that need to join the network.
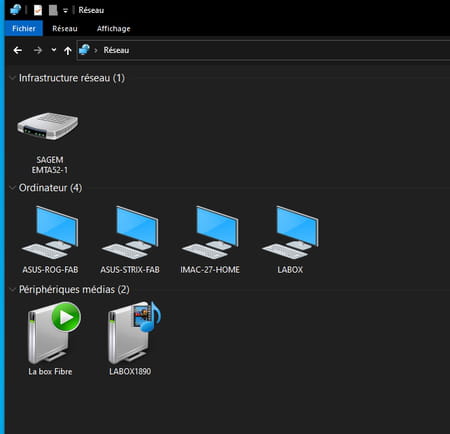
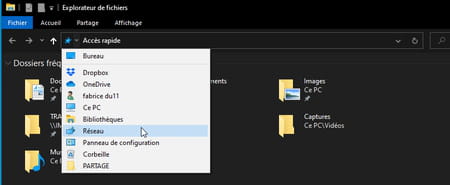
- Your PCs now have the correct configuration for sharing files. On one of them, open File Explorer by pressing the keys Win + E of the keyboard. Click on the arrow to the left of Quick access and choose Network.

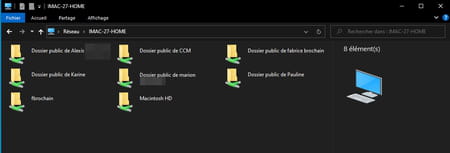
- Windows Explorer shows all the machines currently connected to your local network. The computers you have just configured (including the one you are using), but also your box, when it can act as a server.
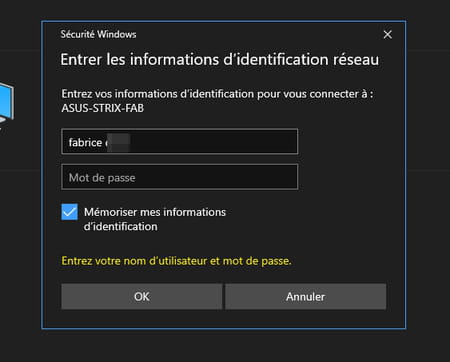
- Double click on the name of one of the PCs connected. In the window that appears, enter a username: you can type anything, even a word that does not match any name. Do not enter a password in the next field and click on OK.
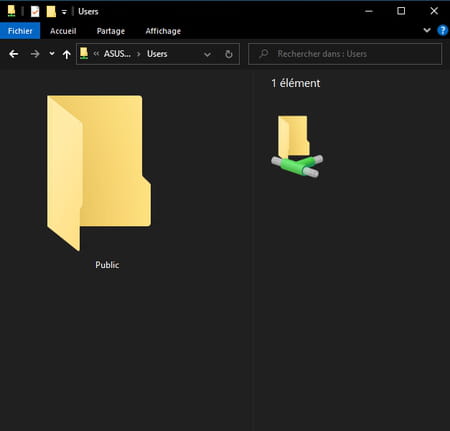
- File Explorer displays a folder icon Users. Open it up. Now a folder is displayed Public. You can drop any file there. It will be copied to the storage space of the PC where it is located. Likewise, all the items in this folder remain accessible to all the computers on the network. It’s still easier to exchange files than to go through a USB key!
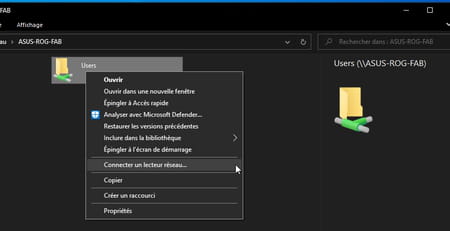
- Finally, you can facilitate your access to this folder Public. Right-click on the folder Users containing the file Public. In the menu that opens, choose Connect a network drive.
- You can leave all options as they are or choose, if you wish, a network drive letter from the menu Reader. Click on To end.

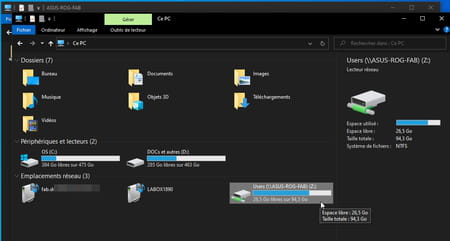
- Now whenever this PC connects to the network, it will show in the list This PC from Windows File Explorer.
The Public folder of Windows user accounts is specially dedicated to file sharing. However, nothing prevents you from sharing the folder of your choice.
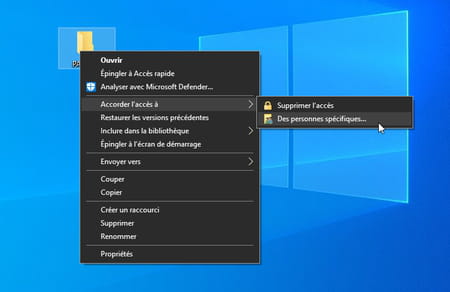
- On one of the PCs connected to the network, for example create a new folder on the Desktop (click with the right mouse button and choose New> Folder. Give the desired name to this folder (we will call it SHARE in our example).

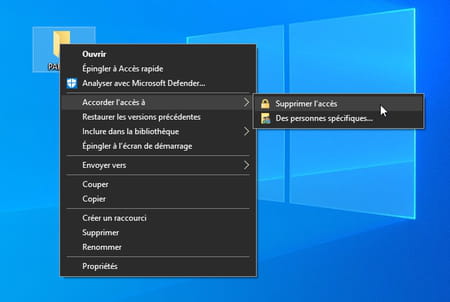
- Right-click on this folder and choose Grant access to> Specific people.
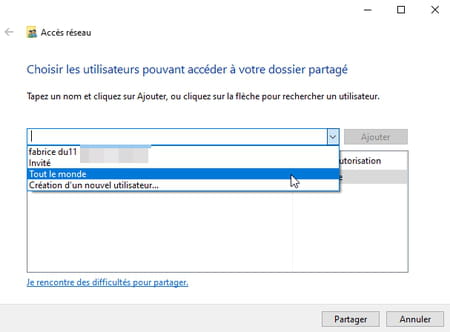
- In the window that appears, click on the arrow pointing down next to the button Add for the moment grayed out. Among the options offered, choose Everybody.
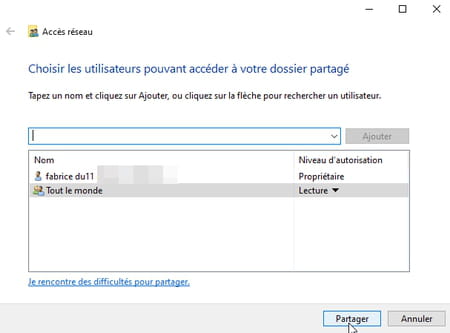
- Click on the button Add became accessible, then the button To share at the bottom of the window.
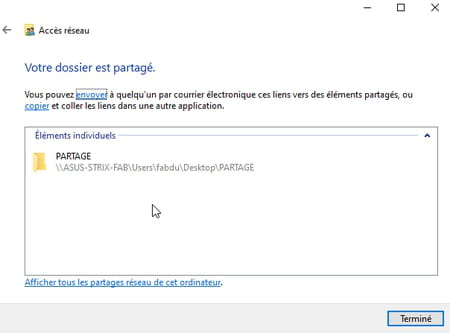
- Windows summarizes your operation and presents the path to the freshly shared folder. Click on Ended.
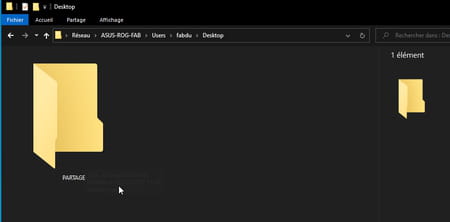
- From another computer, access the PC on which you have just created and share your folder as explained previously. The folder Users contains this time, in addition to the folder Public, a new folder with the user name of the remote PC.

- Open it up. You have access to the file Desktop (Office). Normal, since this is where the folder was created SHARE. Open it to access it. Note that you will not be able to see other items saved on the Desktop of the remote PC: only the shared folder (and its content) remains visible and accessible.
- If you want to end sharing of that particular folder, right-click again on his icon. From the context menu, choose Grant access to> Remove access.
Macs and PCs can communicate… as long as they speak the same language. If you want to integrate a Mac into a network where there are other machines (PC or Mac), you need to make some settings.
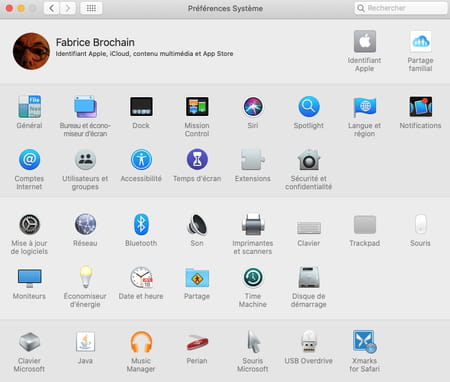
- On the Mac, click the menu Apple, then select go to System Preferences. In the panel that appears, click Share.
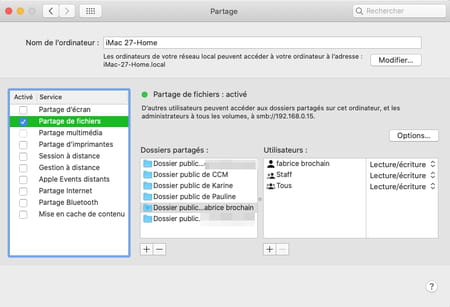
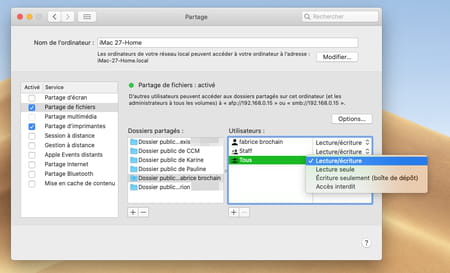
- In the window that appears, check the box File sharing in the left pane. File sharing is immediately activated. Your Mac is visible on the network to other Macs, but not yet to Windows PCs. By default, these are the folders Public of each user account on the Mac that are shared. Click on the button Options.
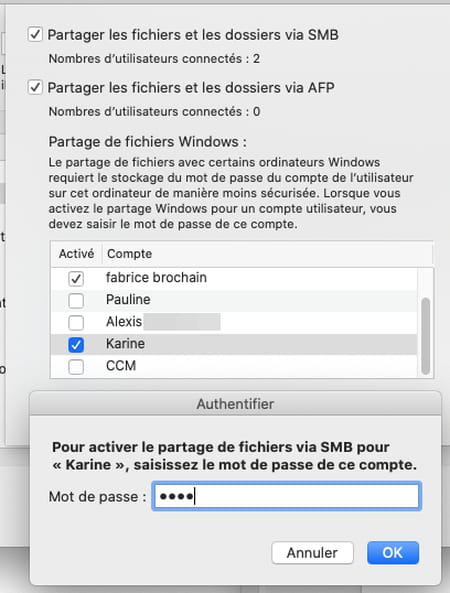
- To make these folders also visible and accessible on PCs, check both boxes Share files and folders via SMB and Share files and folders by AFP. These are two file sharing protocols (Server Message Block and Apple Filling Protocol).

- In the same window, check now the box next to the user name that authorizes file sharing with a PC (if it is the account of another user, this one will have to carry out the operations in his own session). Enter the session password for this account and validate. Click on To close.
- Click on (Username) public folder in the section Shared folders. Assign the access rights of readind, writing for the desired accounts (you, and All). If you choose Writing only (Drop box), other users will only be able to drop files into the Dropbox folder of the folder Public but they will not be able to see what this folder contains.
Access the Mac’s shared folder from another Mac
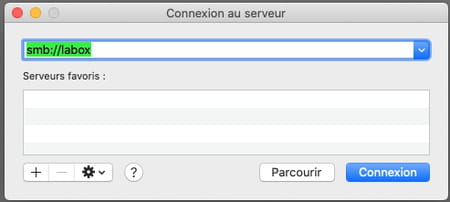
- To access it from another Mac, click on macOS Finder. Press the keys Cmd + K of the keyboard. In the window that appears, click the button Browse.
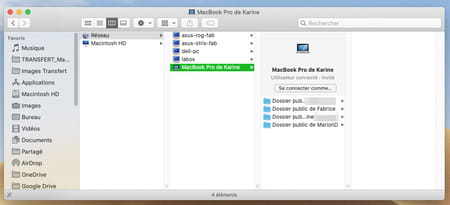
- The list of computers connected to the network is displayed. Click on the name of the one you want to access. The shared folders of different users with accounts on this Mac are displayed.
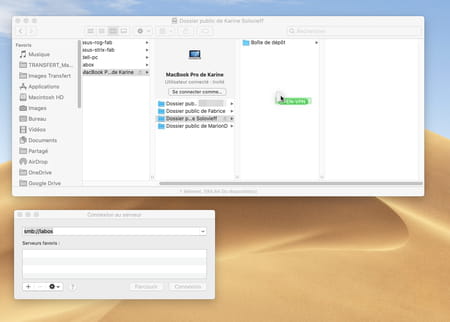
- Click on one of them then drag the file you want to drop them. Be careful, macOS may get tangled up in the brushes and ask you to authenticate. In this case, ask the account holder on the Mac you want to reach to enter their credentials.
Access the Mac’s shared folder from a PC
- The Mac public folder is also visible from PCs on the network. To access it from Windows, open File Explorer by pressing the keys Win + E of the keyboard. Click on the arrow to the left of Quick access and choose Network.
- Explorer shows all the machines currently connected to your local network. The computers you have just configured (including the one you are using) but also your box.

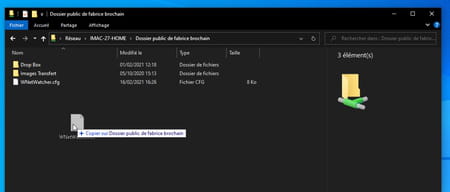
- Double click on the your Mac’s name. The list of shared folders (linked to user accounts on the Mac) is displayed. Open the folder Public of the account to which you have access.
- You can view its contents and drop files there.
Access the Windows shared folder from a Mac
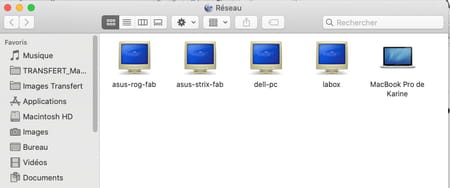
- The Mac also has the right to access PCs connected to the network. To do this, press the keys Cmd + K on the Mac keyboard. In the window that appears, click the button Browse.

- Click on the name of the desired PC.
- You access the file Users then to the file Public (and to other shared folders if the user wanted to share others).
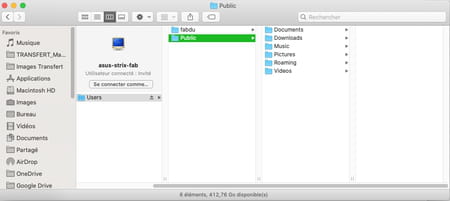
- All that remains is to drop the desired file into one of the predefined folders offered by Windows.