Windows, macOS, and Linux store the IP addresses of the sites you visit in a special memory, the DNS cache. Sometimes this cache must be purged to resolve connection problems. Here’s how to empty it.
When you surf the Web, you leave traces of your passage on the sites you visit. Your web browser also collects – with your consent – cookies in order to facilitate your navigation and subsequent visits to the sites you visit. If you do not want to keep this data, you can obviously clear the browser cache easily by consulting our practical sheet. However, web browsers aren’t the only ones that keep data about the activities you do on the web. Operating systems such as Windows, macOS or Linux also record information, in particular within the DNS cache which stores, temporarily or not, data on the sites visited.
All servers hosting websites have their own IP address on the Internet (read our factsheet here to learn all about IP addresses). However, since it is not easy to remember a series of numbers (like 216.58.215.46), each IP address corresponds to a domain name (like google.com to which this IP address is attached). It is for this purpose that the DNS servers (for Domain Name System) were developed. We can compare them to a gigantic directory which establishes the correspondence between the URLs of the sites as you know them (like www.commentcamarche.net) and their IP addresses on the network. All web browsers contact a DNS server to take you to the website you are requesting. And to speed up the process, OSs keep a DNS cache in which the used – and valid – DNS of the websites visited are kept. Thus, when connecting to a website that you frequently visit, it is this cache that is used to speed up the connection.
Why purge the DNS cache?
Most of the time, the data stored in the cache contains information on the validity period of the DNS. After this defined duration, they are normally deleted from the cache. However, this “lifespan” can be very long. And for a malicious person using your browser, it would be easy to make a list of your web habits by crawling this cache even if you regularly purge your browser’s cache. In addition, in the event of a cyber attack on your PC or Mac, a hacker could easily change the address of a DNS server stored in the cache in order to redirect you to another site without you realizing it. Finally, the DNS cache can also be counterproductive. If a website changes address, the information stored in the cache will not allow you to access it and your browser will display an error message. By regularly purging your system’s DNS cache (an operation called DNS Flush), you can start from a clean base. This is done simply, no matter what system you are using. It is recommended that you do this as soon as your browser directs you to an unusual site instead of the one you normally visit or if you have connection problems on certain sites.
There is no specific application for this operation. To flush your system’s DNS cache, you will need to use one or more command lines. Rest assured, you can copy and paste them to use them so as not to make any typing errors.
To empty the DNS cache on a PC, the easiest way is to go through the classic command prompt or the PowerShell of In Windows 10.
- Right-click the button To start up and choose Windows PowerShell.
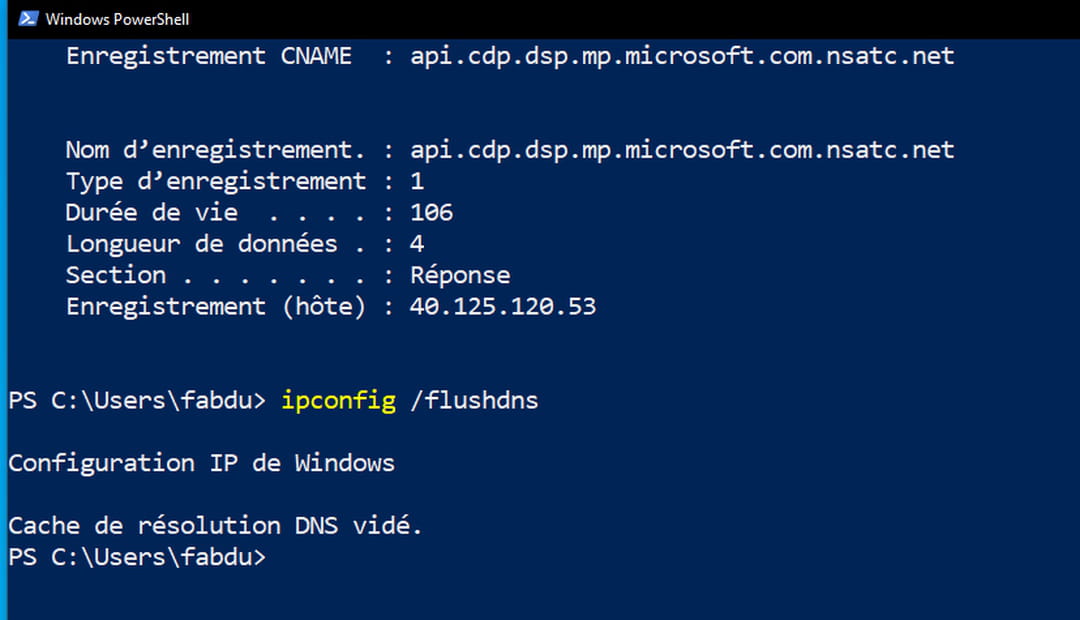
- The command prompt is displayed. You can view the contents of the DNS cache by typing the command: ipconfig / displaydns and validate by Entrance.

- To empty the cache, enter the command ipconfig / flushdns and validate by Entrance.

- A text message then confirms that the cache has been purged.
To empty the DNS cache in macOS, you must type a command on the keyboard via the Terminal. Nothing complicated, don’t worry, even if you are not used to command lines!
- Open the folder Applications > Utilities and launch the application Terminal.
- In the window that appears, type the command sudo killall -HUP mDNSResponder; sudo killall mDNSResponderHelper; sudo dscacheutil -flushcache; say the macOS DNS cache has been flushed and validate by Entrance.

- Your administrator password is then requested. Enter it. It does not appear during entry for confidentiality reasons. Validate by Entrance.

- After a few seconds, an audio message informs you of the success of the operation.
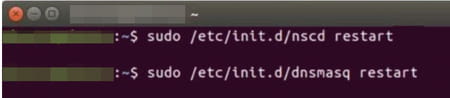
Depending on the Linux distributions, the DNS cache can be saved in different ways. But in all cases, you must use the Terminal to purge it.
- Open the Terminal and enter the command corresponding to the application used.
- For pdnsd: sudo pdnsd-ctl empty-cache and validate by Entrance.
- For dnsmasq, dns-clean or even ncsd: sudo /etc/init.d/dnsmasq restart Where sudo /etc/init.d/dns-clean restart Where sudo /etc/init.d/nscd restart and validate by Entrance in order to restart the service.