A few clicks are enough to personalize the Windows Desktop with the icons of your choice. Or make them reappear when they have disappeared!
Icons are one of the foundations of graphical operating systems like Windows. Whether they represent files, folders, applications, storage units or other elements – the computer, the recycle bin, etc. – we find them everywhere. And in particular on the Windows Desktop, this virtual workspace where you can place shortcuts to quickly open documents or software without having to browse through multiple windows. A manipulation within everyone’s reach, which makes it possible to organize a tailor-made environment.
However, this apparent simplicity can reserve some unpleasant surprises, especially when the icons that had been carefully placed on the desktop disappear without warning. but rest assured, whether it is to place personalized shortcuts or to make disappeared icons reappear, there are solutions for everything…
You have probably noticed it: most of the applications that you install on your PC offer you to place a shortcut on the Desktop – sometimes also in the Start menu or in the Windows taskbar. Even if some don’t ask the question, by automatically creating a shortcut, it’s a fairly simple solution because everything is done automatically and you end up with an application icon ready to use without doing anything.
But nothing prevents you from placing others, to personalize the Desktop and easily access the elements of your choice, whether files or software. The principle is simple: just drag an item onto the Desktop and create a shortcut there.
- Open Windows Explorer and navigate your PC tree to locate the item you want – file, program or folder, it doesn’t matter.
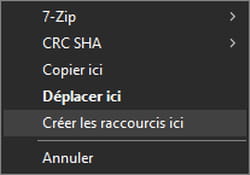
- Right-click – a right-click, therefore – on this element, then, without releasing the mouse button, drag it onto the Desktop.
- Release the right button. A pop-up menu appears. Then click on Create shortcuts here (yes, plural…).
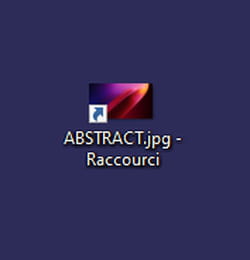
- A shortcut is created. You can then move it with the mouse to position it in another place, but also rename it.
- Note that this operation works just as well with a file (image, office document, application, etc.) as with a folder.

- Be careful, the icon created in this way corresponds to a shortcut, ie a link pointing to the original element, and not to the file or folder itself. It is recognized by the small blue arrow located in the lower left corner and the mention Shortcut, inserted after the name. This has two consequences. First, if the shortcut points to an element stored on a removable medium – USB key, external disk…–, it will only be really functional when the medium is connected to the PC – otherwise, you will be entitled to a message of mistake. Then, as it is a shortcut, you can delete this icon without destroying the original file.
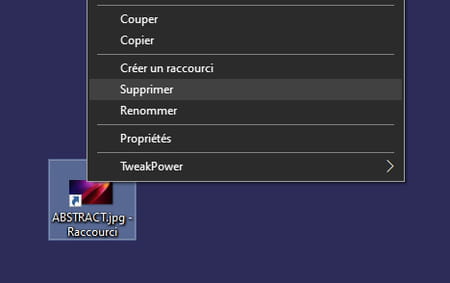
- To remove a shortcut icon from the Windows desktop, right click on it and select To delete in the context menu. You can also click on the icon to select it, then press the key Delete of your keyboard. The result is identical.
In addition to the shortcuts, it is possible to place certain elements directly on the Desktop, mainly files and folders. Be careful though, because this time, by erasing the icons, you really delete the elements concerned! So be careful…
- Open Windows Explorer and browse your PC’s tree structure to locate the item you want – file or folder, but not an application, as it might not work once “out” of its original folder.
- Click on this element, then, without releasing the mouse button, drag it onto the Desktop. This time, no context menu appears. Depending on the case, it will be copied – therefore in duplicate on your PC – or moved – ie removed from its original location.

Note that its icon does not have a small arrow in its lower left corner, nor the mention Shortcut : normal, this is not a shortcut, but the element itself! But you can then move it with the mouse to position it in another place.

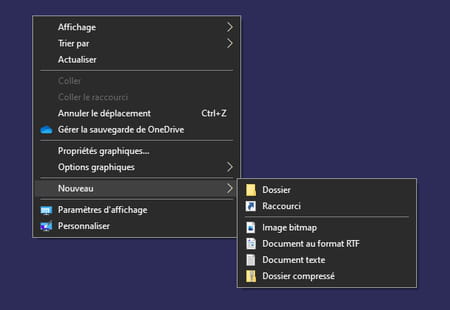
You can also create a new folder or a new document directly on the Desktop, without going through Explorer. To do this, right-click on a free area of the Desktop, then, in the contextual menu, select New. And in the cascading menu that appears, click on one of the proposed options: Case, Shortcut, bitmap, Document in RTF format (rich text), Dtext document (plain text with extension .txt) or Compressed folder (archive in Zip format).
- Note that the item thus moved is then stored in the Desktop folder located in the personal folder of the account with which you carried out the operation, with all the shortcuts that you created for this account. The typical path to find it is (C:) > Users > AccountName > Office.

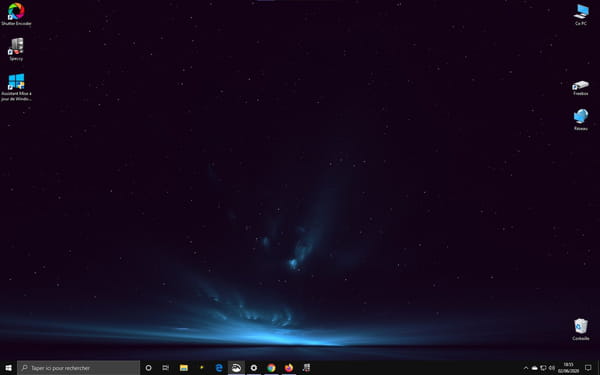
In addition to icons for files, folders and applications, it is very useful to have system icons on the Desktop, especially for the computer – called This PC in some versions of Windows -, network drives and, especially , Trash. You can decide to display them in full, in part – by selecting the elements of your choice – or even not at all.
- Right click on an empty area of the desktopthen, in the pop-up menu that appears, click Personalize.

- With Windows 10, this is the window Parameters that opens to the section Personalization. In the left column, click Themes. In the right part of the window, go to the section Related Parametersthen click Desktop icon settings.

- With Windows 7, the Control Panel is displayed. In the left column, click Change desktop icons.
- In any case, it is the window Desktop icon settings which opens. Check (or uncheck) icon boxes you want to show (or hide) on the desktop: Computer (This PC), User files (the user’s home folder), Network, Basket and Control Panel (which remains active in Windows 10, even if it partly duplicates the Parameters window…).

- If you want more customization, click an icon in the area where they appear, then click the button Change icon. The window Change icon opens. Browse the proposed catalog to select an icon to your liking, then click on OK to validate your choice. If you don’t like anything, click the button Browse, at the top. An explorer window opens. Browse your PC tree to find a replacement icon. To be usable, it must be in .ico or .icl format. You will find plenty of them by searching the Internet. Click on Open to validate your choice and close this window.

- When you’re done, click OK to validate and close the window. The selected icons immediately appear on the desktop.
Desktop icons missing: what to do?
Sometimes, certain icons do not appear or no longer appear on the desktop. If it’s only certain system icons like Computer or Recycle Bin, start by checking the checked boxes in the Desktop Icons settings window, as explained above: this is the easiest way to adjust what is generally just an oversight or a bad adjustment.
But it also happens that due to a mishandling or a bug in Windows, all the usual desktop icons – the Recycle Bin, the computer and all the application shortcuts you placed – disappear altogether. simply leaving just the background blank. There are two methods to make them reappear.
Find desktop icons with display options
The first method is to simply use the desktop display options, which only requires two clicks.
- First, right click on an empty area of the desktop.
- In the context menu that appears, place the cursor on Display.
- A cascading submenu appears. Click on Show desktop items to check this option, if it is unchecked.
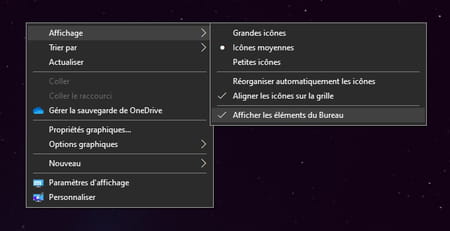
- All icons placed on the desktop should reappear.
Restore Desktop Icons with Command Prompt
If the display problem does not come from this option, it is related to Windows Explorer. In this case, it is necessary to carry out more manipulations and even restart the PC…
- Cllc right on a free area of the taskbar and click on Task Manager in the context menu. You can also type the keyboard shortcut Ctrl + Alt + Del. If you’re on Windows 10, you’ll see a blue screen with a menu. Click on Task Manager. With other versions of Windows, Task Manager opens directly.

- In the Task Manager window, go to the tab Process if not already selected by default and find the line Windows explorer. then right click on this process and click on To restart in the context menu.

- Switch back to the Windows Desktop to see if the icons have returned. If so, it’s over!
- If the icons still don’t appear, go back to Task Manager, right click on Windows explorerthen click end of task in the context menu.

- Still in Task Manager, click on the menu Filethen on Run a new task.

- The window Create a task opens. In the field Opentype cmd then click OK or validate with the key Hall.

- The Command Prompt window opens. After the flashing cursor, type the command cd /d userprofile%AppDataLocalMicrosoftWindowsExplorerthen confirm with the key Hall.

- Then type attrib –h iconcache_*.db and validate again with Hall. This command removes the “hidden” attribute on some cache files. :
- Finally, type del iconcache_*.db then validate again with the key Hall. This last command deletes the cache files so that they can be regenerated.
- It’s over. Close everything and restart your PC. Your icons should be back on the desktop!