
Fancy a cubic adventure with friends? Minecraft reaches out to you, especially since its 1.19 update which has profoundly changed it. We explain how to create a Minecraft server for free.
[Mis à jour le 29 juin 2022 à 15h41] Playing Minecraft alone is good, but with others is better. This is a saying that particularly applies to Mojang’s famous cube game, which offers you the opportunity to create and host a server completely free of charge. To do this, you will still need a stable connection and a relatively powerful computer all the same, since the game server will be hosted directly on your machine. You will also need to open the internet ports of your box, a process that we explain in detail in our article below:
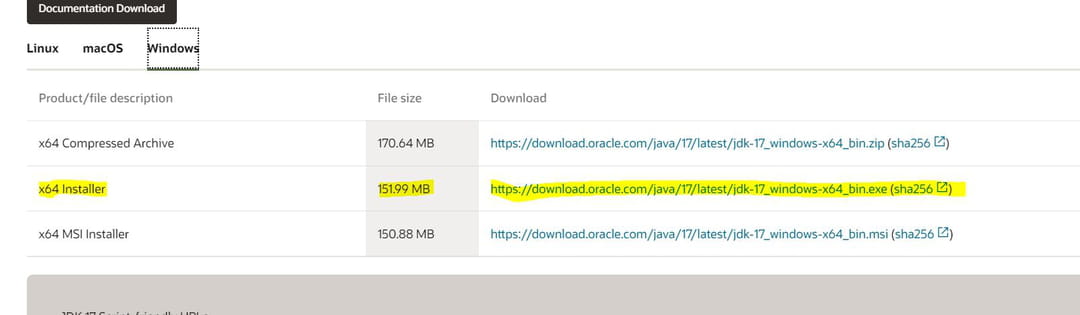
- To create your server, you must first install the Java development kit. To do this, simply go to the next page. Be sure to download the Windows version, “x64 Installer”, then install it.
- Download it server executable file on the official minecraft page here.
- Create a folder in the name of your server
- Paste the executable file there minecraft_server that you will have downloaded beforehand (see above). The file will now be called “server.jar“
- Launch “server.jar“, your server will now start through a command prompt and create its own files in your folder. Please note that you must have previously installed the Java development kit (see above)
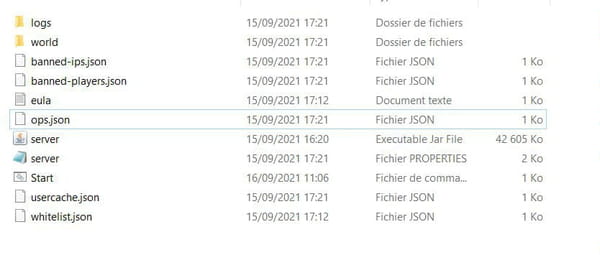
- You now have several files in your folder, including “eula.txt“. Open this text document and change the value”false” by “true“. This allows you to accept the terms of use of the server. Save your changes.

- Launch your server, it will now create the rest of the files necessary for its configuration. You will then get the following files:
Right click on “server.properties“, and open it with notepad. From there, you just have to modify the options you want. We explain which ones are important:
- gamemode=survival : choose the game mode you want by replacing the value with “survival”, “adventure” or even “creative” depending on the game mode you want to play on your server.
- allow-nether=true : decide whether or not you can go into the nether, “true” enables the nether, “false” disables it.
- motd=A Minecraft Server: Choose the name of your server, replacing “A Minecraft Server” with whatever you want.
- pvp=true : Defines the possibility of player versus player battles. Replace with “false” and players will no longer be able to damage each other.
- difficulty=easy : the difficulty mode of your server, the possible values are “easy”, “normal” or “hard”.
- online-mode=true : This option allows you to link your server to official Minecraft servers. If you want to play with your official account and its skins for example, leave the value on “true”. If you choose this option, only players with an official Minecraft account will be able to connect to your server.
Once you have chosen your options, save the file and close it.
Your server is now configured. You can launch it at your leisure via the “Start.bat” file and stop it by entering the command “stop” in the command prompt of the server. To join it, there are two solutions:
- If this is your server, open Minecraft, go to “Multiplayer”, click add server, your own server address is “localhost“. All players connecting to your local network will be able to join the server.
- So that your friends can join your server from home. IAll you have to do is give them your ip address, which you can find on the internet, on monip.com for example, Under the form XXX.XXX.XXX.XXX. The exact address of your Minecraft server is in the form: XXX.XXX.XXX.XXX or XXX.XXX.XXX.XXX:25565 once your ports are open.
If you want other people to be able to join your server, you will need to open the ports on your router. We have also prepared a small tutorial on this subject:
That’s it, it’s now over, once the server has been configured and your ports open, you just have to manage your server options yourself, via the command prompt, and your server’s properties file . Do not hesitate to consult the list of useful commands to manage your server. You can also use a whitelist to define which players are allowed in. Among the useful commands, do not forget to use the command /op
- /op
: gives administration rights to the player - /ban
: bans a player - /unban
: reinstates a banned player - /kick
- /kill
: kills a player - /gamemode
: changes the game mode of the game - /tp
- /time set
- /weather set
: select the weather, sun/rain/storm/snow - /weather clear : prevents rain, snow, thunderstorm from continuing
You now know the primary commands to properly administer your server. Attention, it is important to understand that your IP address should not end up in the hands of just anyone. If you have chosen the solution of hosting your server, you will only need to communicate your IP address to people you trust. That detail aside, your server is your adventure and that of your friends. Feel free to delete the “world” file in your server files folder if world generation doesn’t work for you. The server will automatically recreate a different world the next time it launches. A world that will better suit the wanderings of your little troop. Good luck !