Is your PC behaving abnormally? Error messages appear on startup? It may be time to change the motherboard battery. A very simple operation on a fixed computer, and a little more delicate on a laptop.
If your computer is a few years old and it starts to derail for no apparent reason by displaying strange messages during startup, no longer recognizing certain devices or indicating the wrong time, for example, then it may be time to simply change its battery. More precisely, the battery of its motherboard. And when this battery is worn out, the motherboard loses control, causing errors and malfunctions. Nothing serious, don’t worry! All you have to do is change this famous battery and redo a few settings so that everything is back to normal.
What does the motherboard battery do?
As you probably know, all the elements of a computer, fixed or portable, are arranged or connected to an electronic card called a motherboard. It is she who accommodates all the internal components – processor, RAM, graphics circuit, etc. – and which communicates with external devices via interface sockets – USB, HDMI, etc.
To perform its basic functions, the motherboard uses basic software, the BIOS – to Basic Input Output System– or UEFI – for Unified Extensible Firmware Interface –, its more advanced successor on recent PCs. Also called firmware, this “firmware” takes care of the “physical” functioning of all the elements of the computer even before the operating system. As it is always at work, in the shadows, it is housed directly on the motherboard, in a small programmable circuit, which allows it to be updated. Above all, it is parameterized by the manufacturer or the assembler of the computer according to the components installed. Its settings – processor and RAM frequency, component voltage, interface activation, boot device order, date and time, etc. – are stored in a CMOS type circuit which needs a low but permanent power supply. And it is precisely the motherboard battery that powers it. When the battery is dead, this memory no longer holds, the BIOS or UEFI loses its particular settings and the computer can begin to derail.
How long does a motherboard battery last?
A motherboard battery has an average lifespan of five years. In some very rare cases, it can fail after three years. In others, more frequent, it can take seven, ten or even twelve years. There is no easy way to know its condition, except by removing it to test it with a measuring device. Even if it means tinkering a bit, you might as well replace it! The wisest thing is still to change it as soon as the first symptoms of wear appear… Note, however, that some computers are out of order before the battery of their motherboard!
What are the symptoms of a worn motherboard battery?
When the battery on the motherboard runs out, the BIOS or UEFI loses its settings. This most often results in the loss of the date and time, which return to their original values, often years back. If the computer still manages to start and launch the operating system (OS), this loss of time stamp is invisible insofar as current OSes automatically synchronize with reference clocks via the Internet. Windows thus continues to display the correct date and time in the taskbar and you therefore do not risk detecting this characteristic symptom. But you can check it from time to time by simply going to the BIOS settings, which displays the motherboard clock. If the date and time are not correct, the plaice is worn. Typically, the system date and time can be seen on the settings home screen. If you don’t know how to open the configuration tool, consult our practical sheet Accessing a PC’s BIOS or UEFI.

Other BIOS settings may clear when the battery is low, returning to their default values. But you can only notice this if you are used to looking at them to personalize them, which is not the case for everyone.
But other symptoms should alert you. Especially when they take the form of disturbing messages that appear when the computer starts up, before the operating system loads. Type error messages BIOS CMOS checksum error defaults loaded, BIOS CMOS battery low, CMOS wrong memory size, No operating system detected, CPU overclocking failed, New CPU has been installed, etc Some may actually be related to more or less serious real hardware problems, but the first thing to check when they appear is the status of the motherboard battery (batteryin English).
Finally, the last signs of battery wear are more pernicious, as they can correspond to many other causes. These are sudden crashes, with the famous blue screen of Windows, error messages in certain software, linked to a malfunction of the RAM, peripherals which refuse to work because of a bad adjustment of the associated interface or the loss of the Internet connection only on the computer. In all these cases, as numerous as they are varied, take a look in the BIOS-UEFI to check the date, time and other settings before considering other avenues of investigation: it’s quick and easy , and you will be fixed on a possible cause!
What is the format of a motherboard battery?
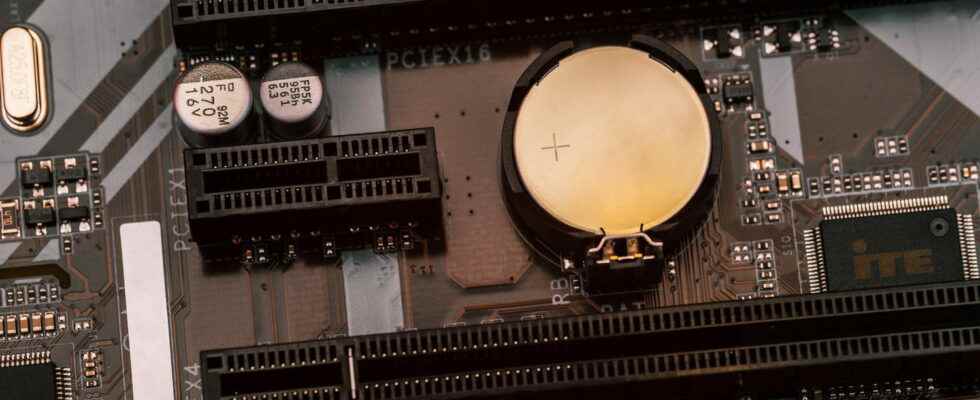
A motherboard stack is nothing out of the ordinary. It is a button type model, round and flat, as is used in many electrical and electronic devices. Generally, it is a 3 volt battery in CR2032 format: CR for lithium battery, 20 for the diameter in millimeters, and 32 for the thickness in tenths of millimeters. An ultra-standard format that is very easily found in stores, in physical stores and online, for a few euros, or even a few cents depending on the brand.

No need to stock up in advance. Not only does the original battery in your computer have a lifespan of several years – you may change computers before it fails… – but, in addition, the batteries have an expiry date. It would be a shame to replace a used battery with an old battery that would not fulfill its nourishing role…
What precautions should be taken before changing the motherboard battery?
First of all, and as long as your PC is working normally, go to the BIOS or UEFI configuration tool to find all the settings, in all the sections. Indeed, when the battery is flat, the settings stored in memory are erased to return to the default values, hence the symptoms mentioned above. And if the battery still holds a little shock, all will be lost when you remove it to replace it.
As it is not possible to take a screenshot in the BIOS setup tool, use your phone to take pictures of the different settings pages. You can also write everything down by hand, on paper or in a word processor on another computer, but it takes longer… You will indeed need to redo the complete configuration of the firmware after changing the battery. In general, the default settings are sufficient, but sometimes there are specific values to respect to take full advantage of your hardware. If you don’t know how to open the configuration tool, consult our practical sheet Accessing a PC’s BIOS or UEFI.
Depending on the case – more exactly, depending on the design of the computer – replacing the motherboard battery can take a few minutes… or much longer!
- Disconnect your computer from the mains and all associated peripherals.
- Before getting your hands inside, discharge your static electricity by touching a grounded metal object such as a radiator or faucet. Indeed, if you are charged with static electricity, you could unintentionally damage very sensitive circuits on your motherboard.
- Place the computer on a flat, stable surface to open its case. The operation is very simple with a desktop PC: you usually have to remove a few screws at the back to release a side panel. On some models, it is even enough to slide a small lock on the back. If necessary, consult the manufacturer’s instructions, which must indicate the manoeuvre. On the other hand, the operation is more delicate with a laptop. In some cases, when the manufacturer has designed his model well in order to facilitate its maintenance, everything is fine. But in others, it is a real punishment. And for a result that is not guaranteed! But who doesn’t try anything… Place the laptop upside down, on a flat surface, and remove the screws that hold the lower part of the case. Sometimes you have to remove them all, but in some cases, you just have to clear a small access hatch. In the best case, removing the bottom panel is enough. In the worst case, you have to remove the keyboard, delicately removing tiny tablecloths, which is dangerous for the uninitiated. If you have any doubts, consult the manufacturer’s instructions, which must indicate the manoeuvre. You can also search YouTube by listing your model name and brand with keywords like unmount Where to disassemble : many do-it-yourselfers post videos where they detail the dismantling of a laptop, which will take you time.
- Once the cover is completely open and the motherboard is accessible, remember to discharge your static electricity again before touching any components.
- Examine the motherboard carefully. The battery is usually in a small round plastic holder. Be careful, even when it is easily visible, it can be difficult to access because of cables and cards plugged into surrounding connectors. In this case, remove everything that obstructs its access, taking care to note what you are doing to reconnect everything identically afterwards.

- Note the direction in which the battery is inserted. most often, the + face is above. Using a small accessory or miniature tweezers, preferably plastic, gently remove the used battery from its housing, without forcing it.
- Insert the new battery in place, in the correct direction, making sure that it is well maintained, flat, without moving, to ensure good contact.
- Carefully reconnect all the cables and cards you removed.
- Return the computer to its normal position, without closing its casing, and reconnect it to the mains. Also connect the keyboard and screen if it is a fixed PC.
- Restart the computer and immediately go to the BIOS-UEFI settings. Set the system clock to the correct date and time and reset the settings to the values you noted beforehand as instructed. Save your settings and start your computer normally.
- If everything is working normally, shut down your computer. Wait a few minutes to restart it and go back to BIOS-UEFI settings. If your settings are stored correctly, the new battery is working perfectly. You can close the case and use your PC as before. If your settings have disappeared, the battery is not good or it is inserted incorrectly. All you have to do is start the process again…
